This article will outline how to setup the necessary accounts for two-way GAL sync in CiraHub. To set up a GAL Connection a Microsoft 365 Admin account will be necessary, and a Microsoft Service Account is suggested.
What is an Admin Account?
A Microsoft admin is a user role which has administration capabilities across Microsoft online services. The account owner has additional privileges, such as having the ability to reset all users’ passwords, add and edit domains, or even unblock other global administrators.
How Do I Become an Admin?
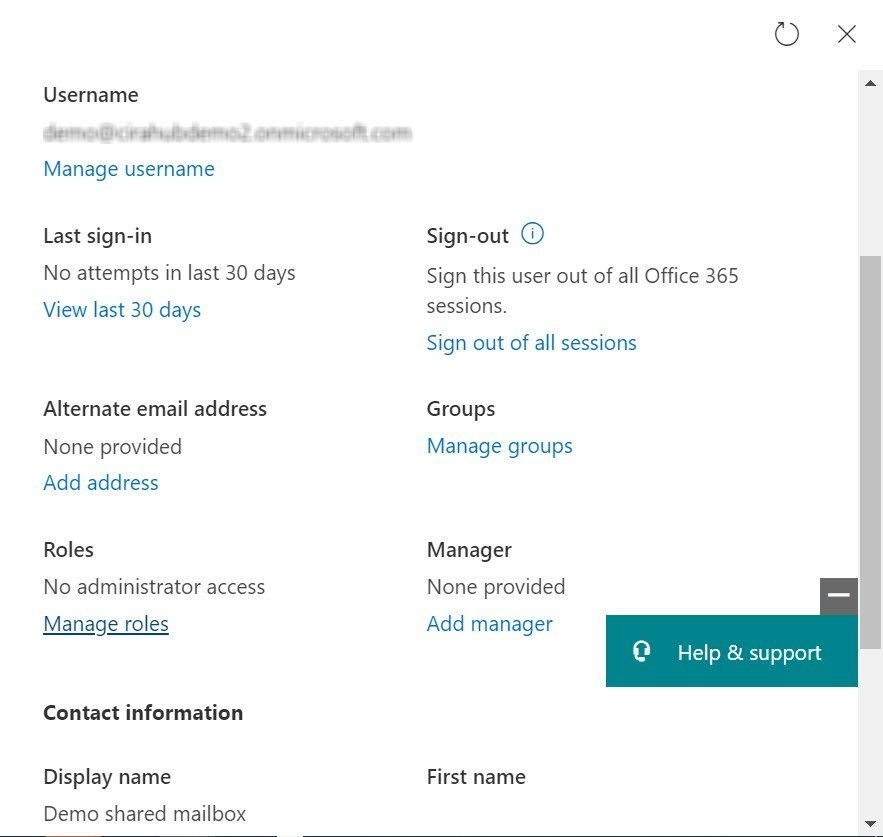
A Microsoft 365 subscription includes a set of admin responsibilities, which may be assigned using the Microsoft 365 admin center. Select the app launcher when logged in to Microsoft 365. If the Admin button is present, then this account already has global admin privileges. To assign admin roles, navigate to the Microsoft 365 admin center by selecting Admin. Select Users > Active users from the left navigation window and choose the person you wish to designate an administrator. After selecting Users > Active users and after searching for the person that should be given GA role, one needs to click on that user and open additional user settings. In there, Under “Roles” section, one needs to click on “Manage Roles” in order to assign this role to the user.
An admin account is required for CiraHub to be able to connect to your Microsoft 365 Exchange Online accounts. Following this, enter the login (username and password) of an account with the “Global Admin” role inside your business. For example, to set up two-way Gal Sync, users will need to have an Microsoft 365 account in each tenant with the Global Admin role assigned to it for setting up and providing Microsoft’s access permission. Click here to learn more about how to set up a Global Admin Account.
What is a Service Account?
A Microsoft service account is used to operate one or more services or applications in a Windows system. It is recommend that users create a dedicated service account for CiraHub. A dedicated service account enables users to independently grant and limit access to certain Microsoft 365 tenant accounts.
When utilizing personal Microsoft 365 credentials the password expires periodically, however with a dedicated service account password can be set to never expire. It’s also important to note that a service account can be disabled without impacting other accounts or CiraHub services and access to it can be granted to other users without exposing the account’s password.
How do you Assign Microsoft Exchange Roles?
A Microsoft 365 subscription includes a set of admin roles, which you may assign to users in your organization using the Microsoft 365 admin center. Admin roles give users permission to examine data and complete tasks in Microsoft admin centers. Admin roles are important because with CiraHub, each tenant’s Microsoft 365 service account must have the necessary Exchange Online roles: Address Lists, Mail Recipient Creation, and Mail Recipients permissions to conduct the GAL sync.
- Navigate to the Users > Active users page in the admin center.
- On the Active users page, select the user whose admin role you want to change. In the flyout pane, under Roles, select Manage roles.
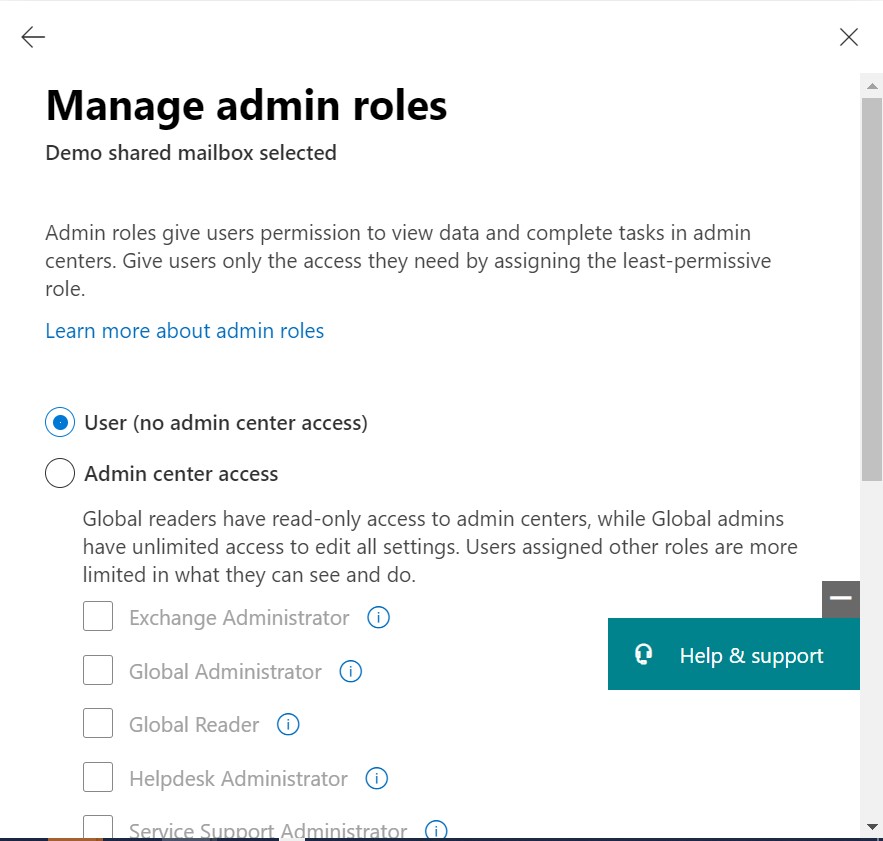
- Select the admin role that you want to assign to the user.
How do you Create a Dedicated Service Account?
1. Launch the Microsoft 365 Admin Center.
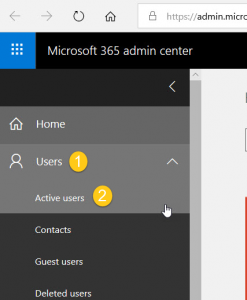
2. Click on Users > Active Users in the left navigation panel. (See figure
below.)
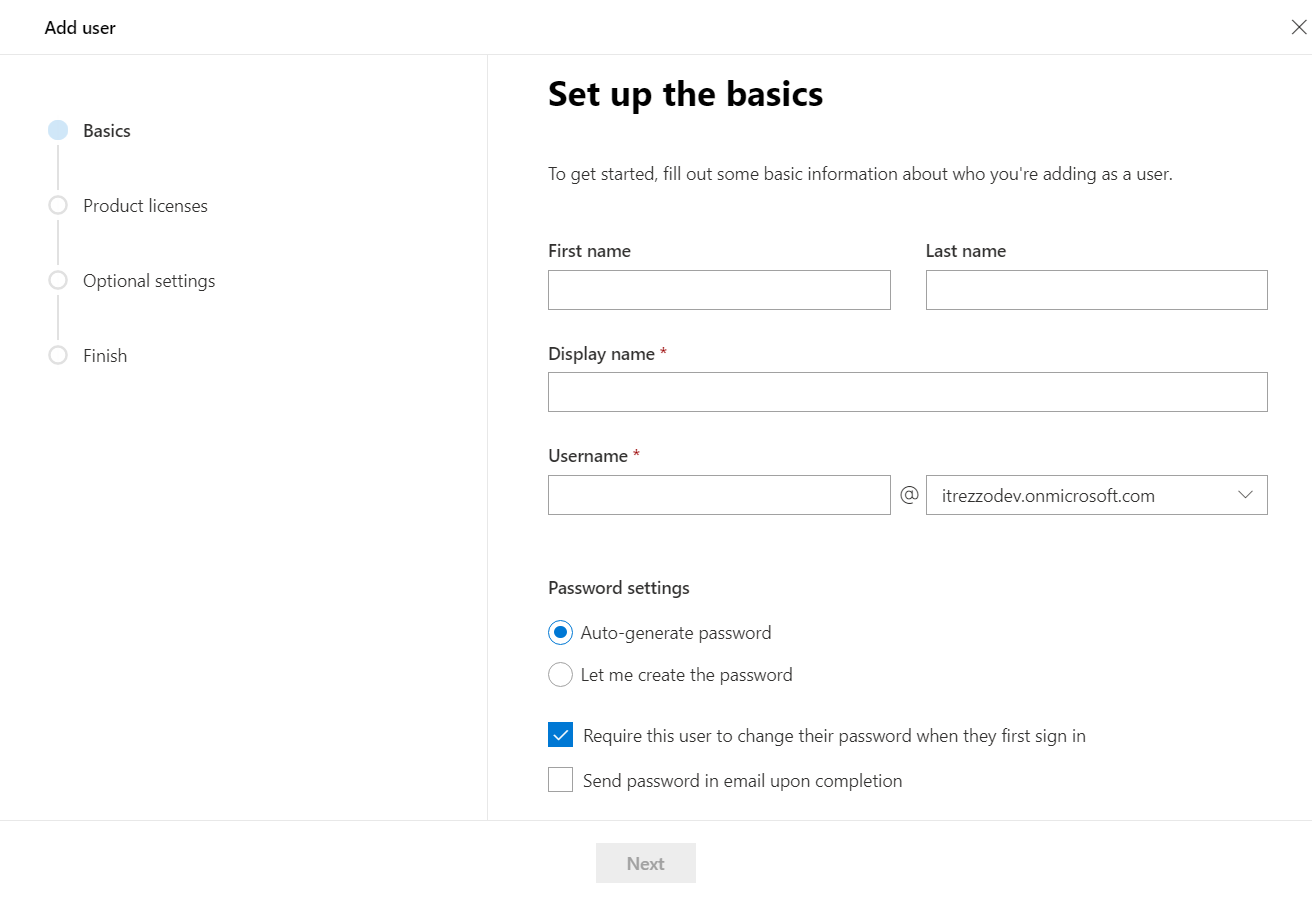
3. Click + Add a user button. The Add a User wizard will pop-out on the
right side of the window.
4. Fill in the required fields.
5. Click Let me create the password option under Password settings.
6. Create a strong password for the account.
7. Click Send password in email upon completion.
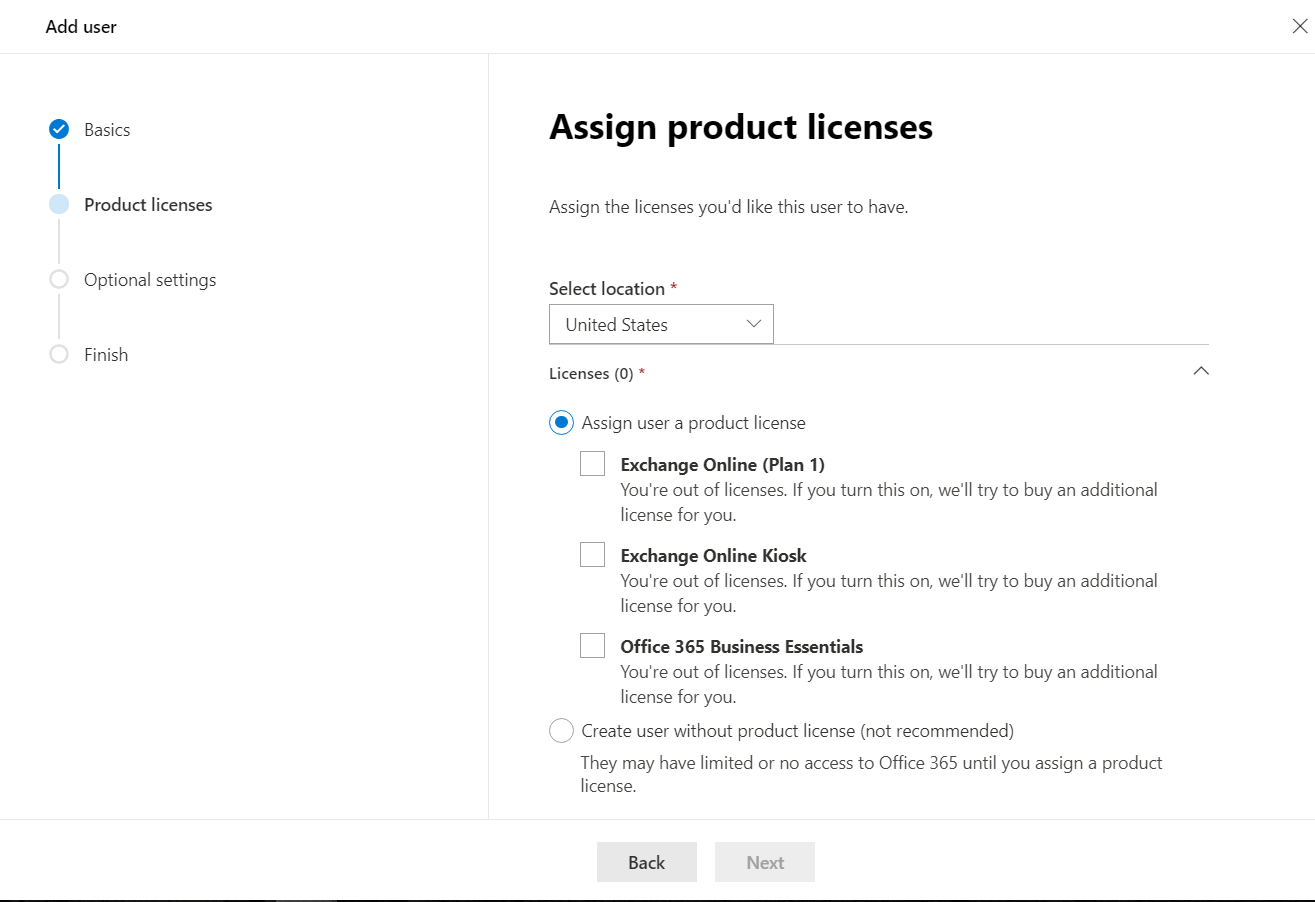
8. Click Next. You will be taken to Assign product licenses portion of the
wizard. (See figure below.).
9. Select the location of the service account.
10. Select an Exchange License or the Create user without product
license option.
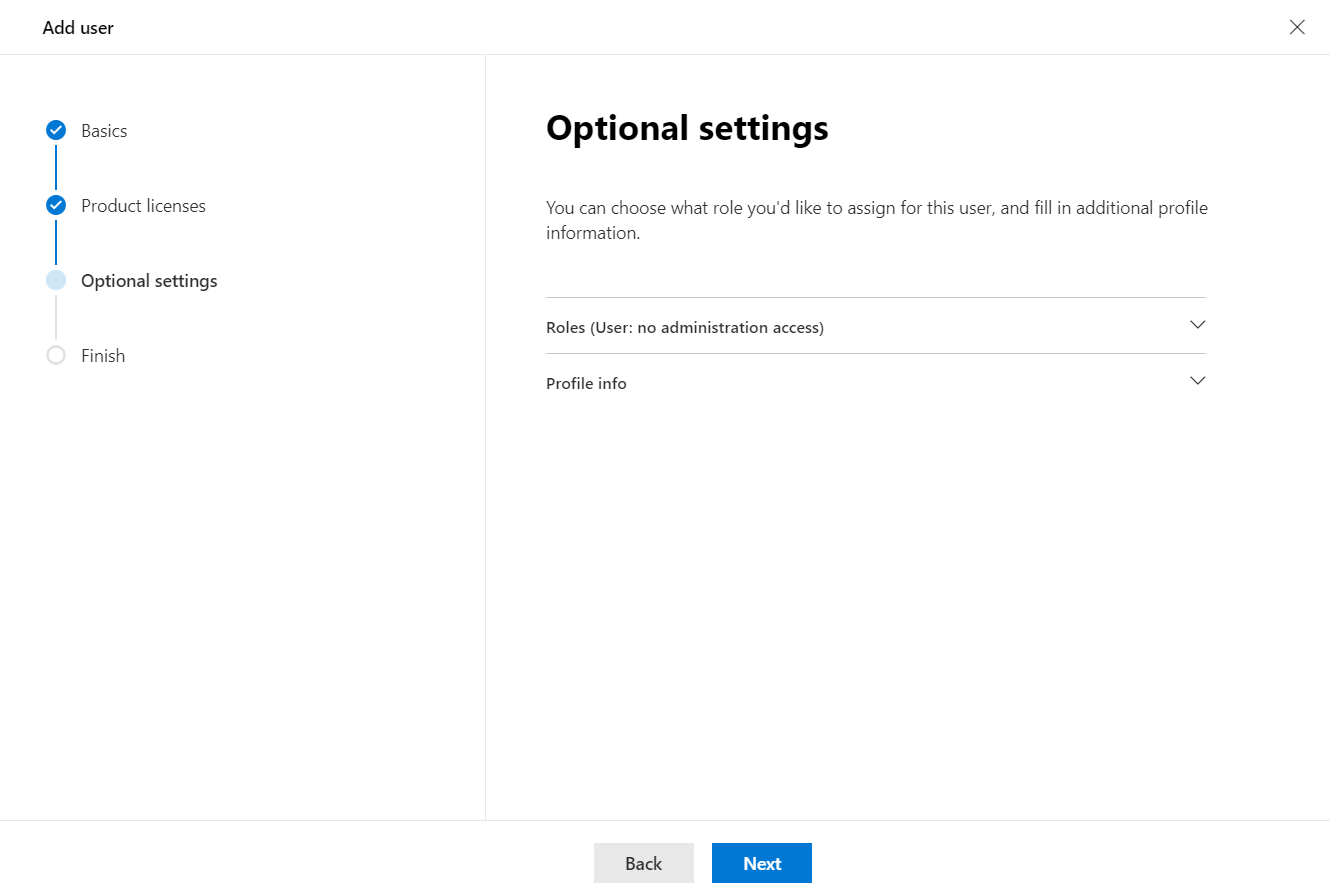
11. Click Next. You will be taken to the Optional settings portion of the
wizard. (See figure below.)
12. Click Roles. This will expand the User Roles section of the wizard.
13. Select Admin center access > Global admin.
14. Click Next. You will be taken to the Review and finish adding portion of
the wizard.
15. Review all the information provided to the wizard > Click Finish adding.
Learn More About CiraHub!
CiraHub is a two-way sync platform for shared contacts and calendars for Microsoft 365, Exchange Server, and other Microsoft Enterprise Applications users. The software is designed to make it easy for people lacking IT expertise to set up shared contact and calendar sync for their company. For more information check out FAQ page and our CiraHub Onboarding Guide.

